A proper kitchen packing guide is essential for every household relocation. The kitchen contains the highest concentration of fragile items, heavy appliances, and oddly shaped tools in your entire home — making it the most time-consuming and stress-inducing room to pack. From wrapping glassware and packing dishes safely to moving kitchen appliances and organizing pantry items, this kitchen packing guide walks you through every step of preparing your kitchen for moving day. Whether you are relocating across Ottawa, moving from Toronto to the capital region, or managing a long-distance move across Canada, understanding how to pack your kitchen systematically prevents breakage, saves time, and reduces the chaos that typically surrounds kitchen relocation.
This kitchen packing guide covers everything you need: packing supplies, room-by-room strategy, fragile item wrapping techniques, appliance preparation, labeling systems, and timeline planning. By the time you finish reading, you will have a clear action plan for tackling the most challenging room in your home.
For the complete moving preparation framework beyond just kitchen packing, the complete moving guide covers every phase of your relocation from planning through settling in. For detailed packing strategies across your entire home, explore the complete packing guide for moving. And for those managing long-distance relocations, the long-distance moving guide provides Canada-wide relocation context.
Why the Kitchen Requires a Dedicated Kitchen Packing Guide
Kitchens demand more packing attention than any other room because they combine three challenging variables simultaneously: fragile items that break easily, heavy items that injure packers who lift incorrectly, and food items that spoil or spill if not handled properly.
Your kitchen likely contains hundreds of individual items across dozens of categories — plates, bowls, glassware, silverware, cookware, bakeware, small appliances, pantry staples, spices, cleaning supplies, and miscellaneous tools. Each category requires different packing materials and techniques. Plates need cushioning and vertical stacking. Glassware requires individual wrapping and secure box positioning. Appliances demand original packaging or custom padding. Pantry items need leak-proof containment and weight distribution.
Without a systematic kitchen packing guide, most people pack randomly, mixing fragile and non-fragile items, overloading boxes, and creating labeling chaos that makes unpacking a nightmare. Metropolitan Movers Ottawa has witnessed thousands of kitchen packing disasters — broken heirloom china from insufficient wrapping, crushed glassware from overweight boxes, and spoiled pantry items from improper sealing.
Following this kitchen packing guide prevents those outcomes and transforms your kitchen packing from overwhelming to manageable.
Kitchen Packing Supplies You Need Before You Start
Before touching a single dish, gather all necessary packing supplies. Running out of materials mid-pack wastes time and breaks your packing rhythm.
Essential Kitchen Packing Supplies:
- Small and medium moving boxes — kitchens require smaller boxes than bedrooms because dish and glassware boxes become too heavy when oversized
- Dish pack boxes — specialized double-walled boxes with built-in cardboard dividers for plates and bowls
- Cell kits for glassware — cardboard cell dividers that create individual compartments for stemware and glasses
- Packing paper — unprinted newsprint or butcher paper for wrapping dishes, glassware, and fragile items (never use printed newspaper which transfers ink)
- Bubble wrap — for extra protection on heirloom china, crystal, and specialty glassware
- Stretch wrap — for securing drawers, bundling silverware, and wrapping appliances
- Heavy-duty tape — reinforced packing tape rated for box weight
- Markers and labels — color-coded labels or detailed written labels identifying contents and destination room
- Ziplock bags — for screws, hardware, and small parts from disassembled appliances
The packing supplies you need guide provides a complete checklist for sourcing materials, and the how to pack for moving resource covers packing principles that apply beyond just the kitchen.
Kitchen Packing Guide: Step-by-Step Room Strategy
This kitchen packing guide follows a systematic room-by-room approach that minimizes breakage and maximizes efficiency.
Week Before Moving Day: Declutter and Donate
Start your kitchen packing guide timeline one week before moving day by purging items you no longer use. Expired pantry items, duplicate utensils, chipped dishes, and small appliances you have not touched in a year should be discarded or donated. Reducing kitchen inventory by 20–30 percent before packing saves boxes, time, and moving truck space.
3–5 Days Before Moving: Pack Non-Essentials
Begin packing items you will not need before moving day: specialty bakeware, seasonal serving platters, wine glasses, cocktail equipment, and decorative items. This phase allows you to practice wrapping techniques and build packing momentum without disrupting daily meal preparation.
2 Days Before Moving: Pack Primary Kitchen Items
Pack everyday dishes, cookware, and pantry staples, leaving only essentials for your final meals. By this point, you should be eating from disposable plates and minimal cookware.
Moving Day Morning: Pack Final Essentials
The last items packed are your coffee maker, toaster, a few mugs, and cleaning supplies used for final wipe-downs.
Packing Dishes Safely: Plates, Bowls, and Serving Platters
Packing dishes safely requires the right materials, proper wrapping technique, and strategic box placement to prevent shifting during transit.
How to Wrap Plates:
- Lay 3–4 sheets of packing paper on a clean surface
- Place one plate in the center
- Fold one corner of paper over the plate, then rotate and fold the next corner
- Continue rotating and folding until the plate is fully wrapped
- Secure with a small piece of tape
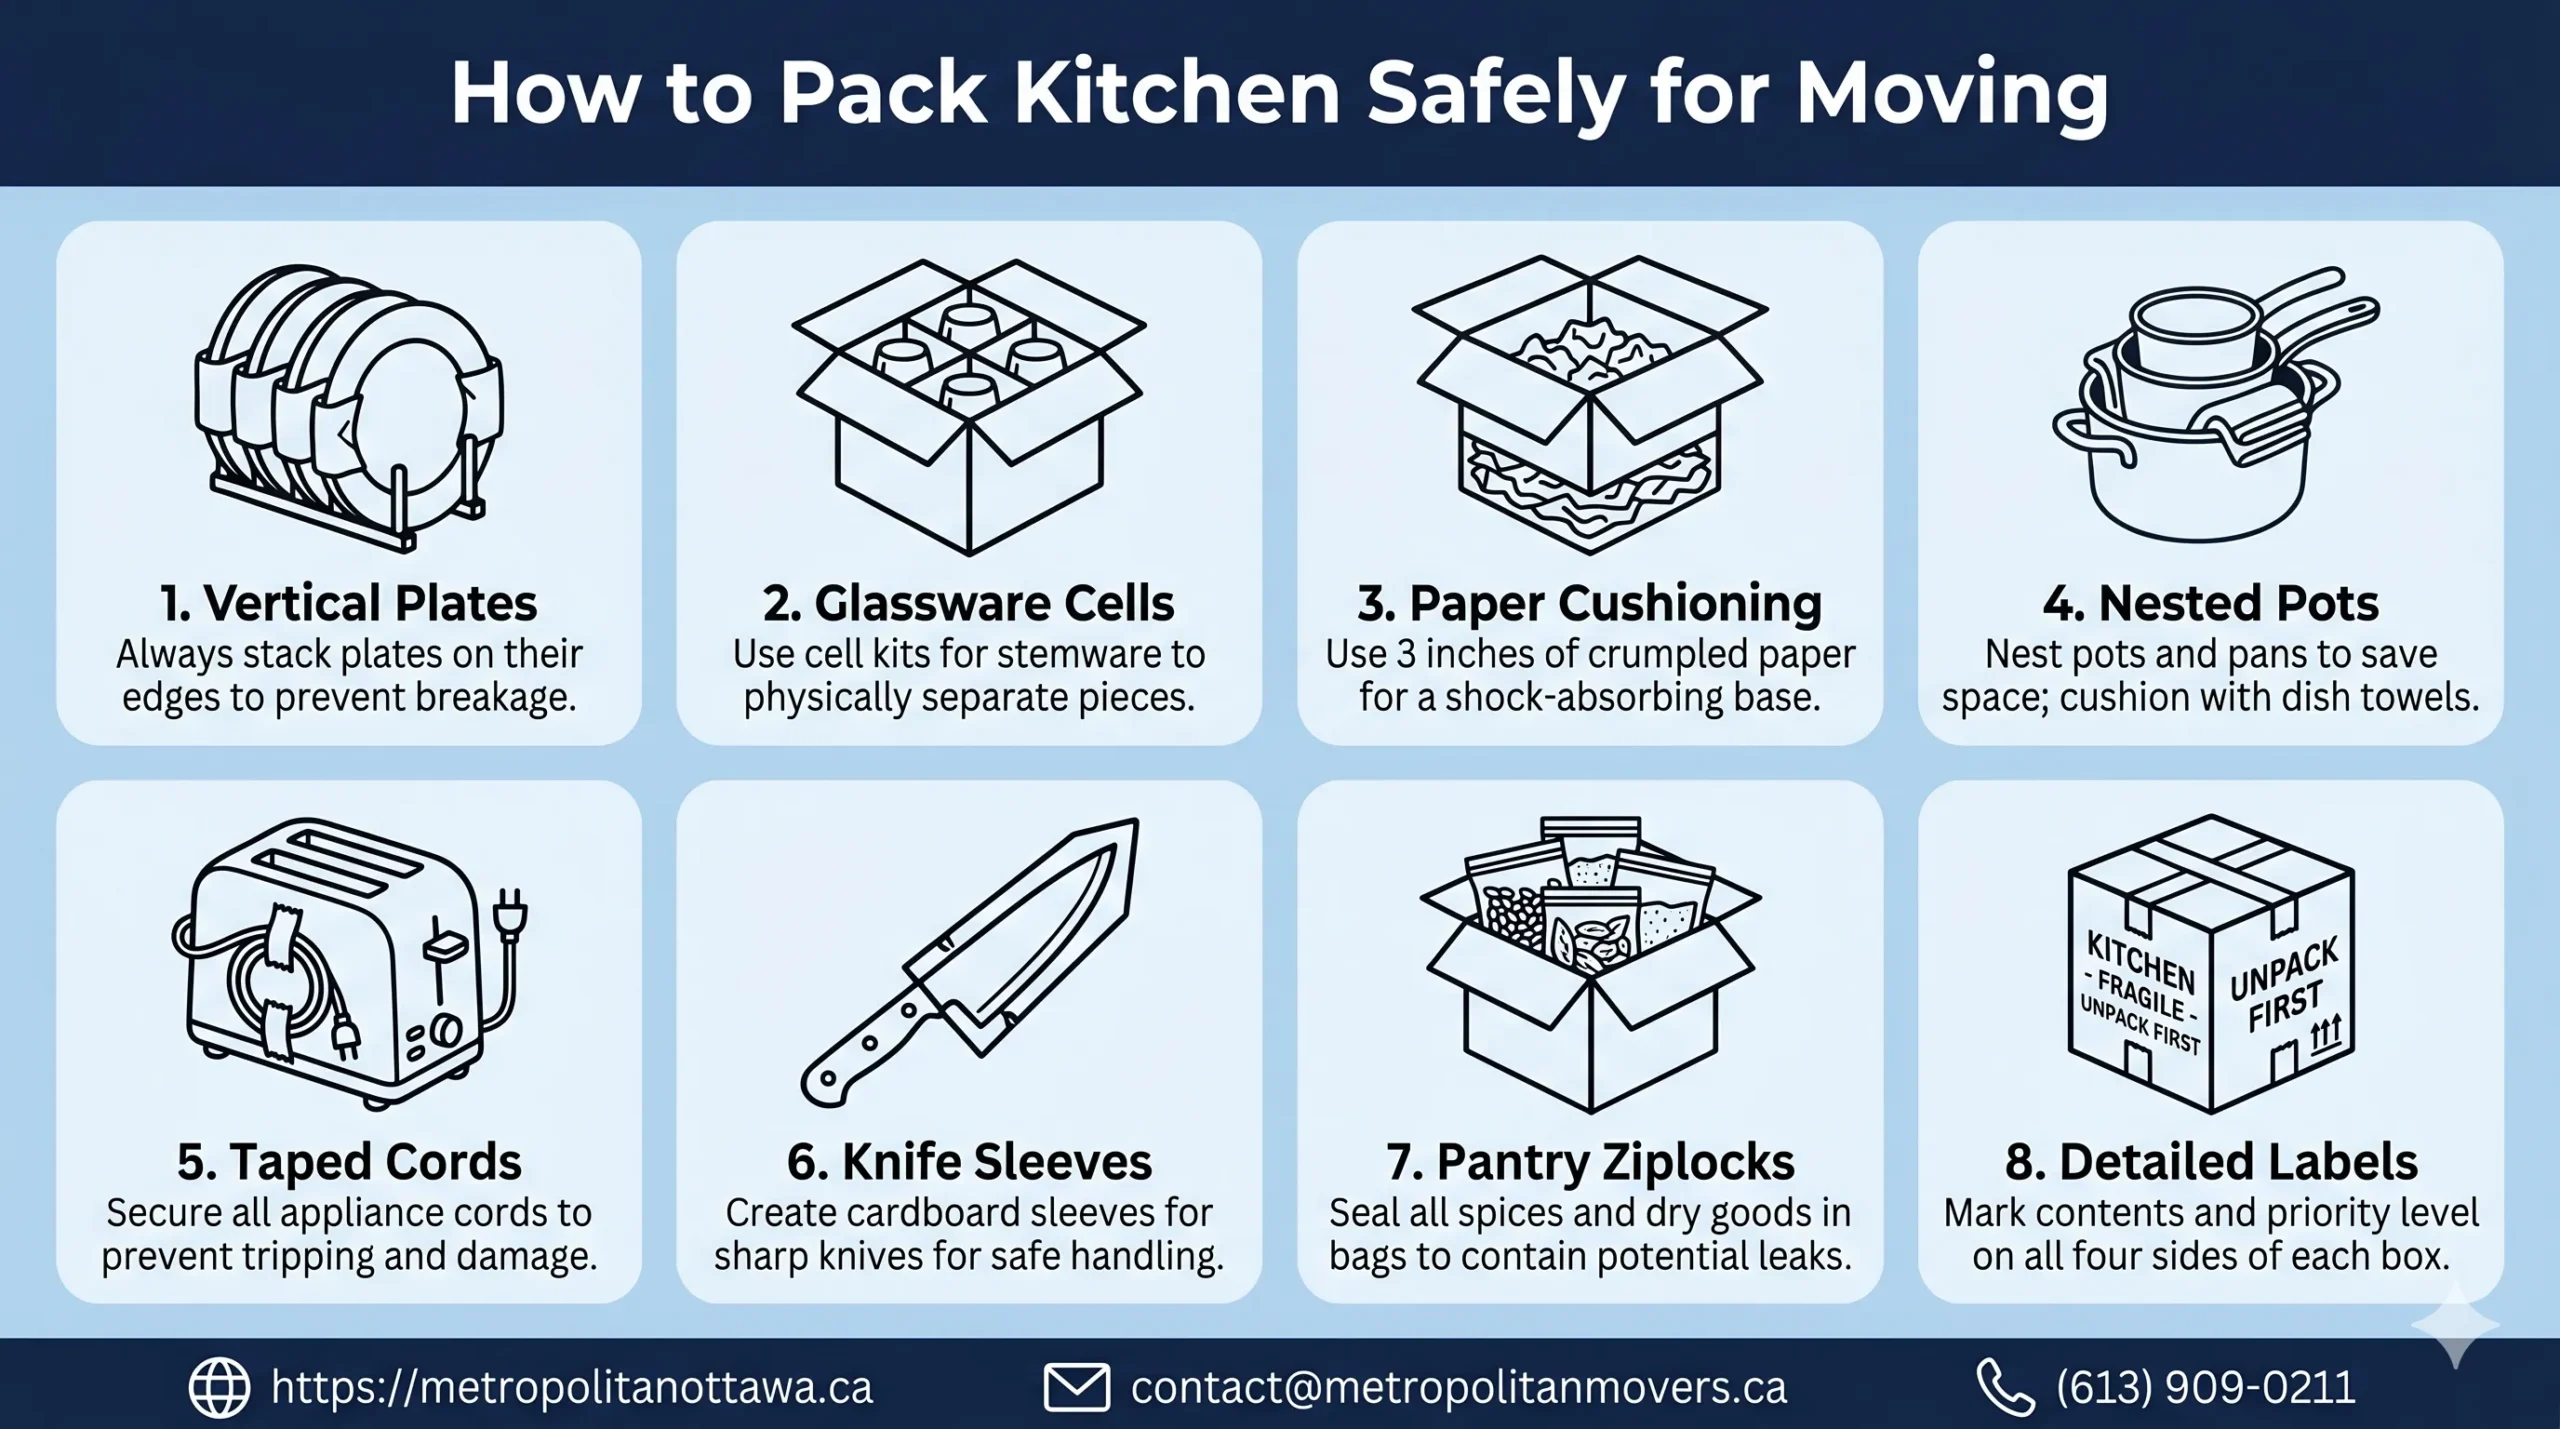
- Stack wrapped plates vertically (on their edges) inside dish pack boxes — never lay plates flat, as vertical stacking distributes weight more safely
How to Pack Bowls:
Bowls nest naturally, but you still need cushioning between each piece. Wrap bowls individually, then nest 2–3 wrapped bowls together before placing them in boxes. Fill empty bowl cavities with crumpled packing paper to prevent crushing.
Box Packing Strategy:
Line the bottom of each box with 2–3 inches of crumpled packing paper for cushioning. Place heavier items (dinner plates, serving platters) at the bottom, lighter items (salad plates, saucers) on top. Fill all empty spaces with crumpled paper so nothing shifts. Keep box weight under 50 pounds — dishes are deceptively heavy.
For comprehensive fragile item protection beyond dishes, the how to pack fragile items guide covers china, heirlooms, and breakable decoratives across your entire home.
Packing Glassware Tips: Protecting Stemware, Tumblers, and Crystal
Packing glassware safely demands extra care — glass breaks more easily than ceramic and china, and stemware carries additional fragility due to thin stems and delicate bowls.
How to Wrap Glassware:
- Stuff the inside of each glass with crumpled packing paper to prevent inward crushing
- Wrap the entire glass in 2–3 sheets of packing paper, starting from the base and working upward
- For stemware, wrap the bowl and stem separately, then tape gently to secure
- For crystal or heirloom glassware, add a layer of bubble wrap over the packing paper
Using Cell Kits:
Cell kits — cardboard dividers that create individual compartments — are essential for glassware packing. Each glass sits in its own protected cell, preventing glass-to-glass contact that causes breakage. Place wrapped glasses upright (never upside down) in each cell, and fill the top with crumpled paper before sealing the box.
The how to pack glassware dedicated guide provides visual packing techniques and material recommendations specific to different glass types.
Kitchen Packing Guide: Appliances, Cookware, and Pantry Items
| Kitchen Category | Packing Method | Materials Needed | Special Notes |
|---|---|---|---|
| Plates & Dishes | Wrap individually, stack vertically in dish pack boxes | Packing paper, dish pack boxes, tape | Never stack flat — vertical stacking prevents breakage |
| Glassware & Stemware | Stuff inside, wrap fully, use cell kits for separation | Packing paper, bubble wrap, cell kits, tape | Crystal and heirloom pieces require bubble wrap layer |
| Pots, Pans & Cookware | Nest smaller pots inside larger, wrap lids separately | Packing paper, medium boxes | Place dish towels between nested pots to prevent scratching |
| Small Appliances | Use original boxes if available; otherwise wrap and cushion heavily | Bubble wrap, medium boxes, tape | Remove glass carafes and pack separately; tape cords to appliance body |
| Silverware & Utensils | Bundle in groups with stretch wrap, pack upright in small boxes | Stretch wrap, small boxes, ziplock bags | Keep sharp knives wrapped separately in cardboard sleeves |
| Pantry Items (Dry Goods) | Seal open packages in ziplock bags, pack in small boxes | Ziplock bags, small boxes, tape | Discard expired items; avoid moving bulky low-value staples like flour |
| Spices & Condiments | Check lids for tightness, pack upright in small boxes with dividers | Ziplock bags, small boxes, bubble wrap for jars | Place entire spice box in a large ziplock in case of leaks |
| Kitchen packing guide — methods and materials by category. Always prioritize weight distribution and cushioning for fragile items. | |||
Moving Kitchen Appliances: Refrigerators, Dishwashers, and Small Electronics
Moving kitchen appliances requires advance preparation — most cannot simply be unplugged and loaded onto a truck.
Refrigerator and Freezer Preparation:
- Defrost 24–48 hours before moving day to allow complete ice melt
- Remove all food and shelving
- Clean and dry the interior thoroughly to prevent mold during transit
- Secure doors with stretch wrap or moving straps (never use tape directly on appliance surfaces)
- Disconnect water lines if applicable and cap connections
Dishwasher Preparation:
Built-in dishwashers typically stay with the property. Portable dishwashers should be drained completely, hoses disconnected, and secured for transport.
Small Appliances:
Coffee makers, toasters, blenders, stand mixers, and food processors should be packed in their original boxes whenever possible. If original packaging is unavailable, wrap each appliance in bubble wrap, secure cords with twist ties or stretch wrap, and pack in appropriately sized boxes with cushioning on all sides.
Remove any glass components (blender jars, food processor bowls, coffee carafes) and pack them separately using glassware wrapping techniques.
For households managing full-home packing beyond just the kitchen, the packing and unpacking service from Metropolitan Movers Ottawa provides professional handling of every room, and the packing checklist for moving ensures nothing gets overlooked.
Kitchen Labeling System: Why Detailed Labels Prevent Unpacking Chaos
A proper kitchen labeling system is as important as wrapping technique. Without clear labels, you will open every box to find the coffee mugs on your first morning in the new home.
Effective Kitchen Labeling Strategy:
- Room destination: “KITCHEN” in large letters on all sides of the box
- Contents detail: “Everyday Plates — China Cabinet” or “Coffee Mugs — Upper Cabinet Left”
- Fragile indicators: “FRAGILE — GLASS” or “FRAGILE — CHINA” on all four sides and top
- Priority unpacking: Mark boxes containing first-day essentials (coffee maker, mugs, basic utensils) with “UNPACK FIRST” or a colored dot system
Color-Coded Labels:
Assign each room a color (kitchen = green, bedroom = blue, etc.) and use colored stickers or tape on every box. This visual system allows movers to place boxes in correct rooms without reading detailed labels.
For comprehensive moving day logistics that rely on proper labeling, the moving day guide covers timeline coordination, and the how to unpack after moving resource guides efficient unpacking sequencing.
Wrapping Silverware, Utensils, and Kitchen Tools
Wrapping silverware and kitchen tools requires different techniques than dishes or glassware because of their irregular shapes and sharp edges.
Silverware and Flatware:
Bundle silverware in groups of 6–8 pieces, wrap with packing paper, then secure the bundle with stretch wrap. Pack bundles upright in small boxes, cushioning between bundles with crumpled paper. Keep everyday flatware separate from special occasion silverware to simplify unpacking.
Kitchen Knives:
Sharp knives require careful packing to protect both the blades and the packers. Wrap each knife individually in packing paper, then slide the wrapped knife into a cardboard sleeve (cut from a flattened box). Label the sleeve “SHARP — HANDLE WITH CARE” and pack knives in a clearly marked box separate from other kitchen items.
Kitchen Utensils and Tools:
Spatulas, whisks, ladles, and serving spoons can be bundled together with stretch wrap and packed in medium boxes. Avoid mixing sharp tools (graters, zesters, peelers) with non-sharp items.
Packing Pantry Items: Dry Goods, Spices, and Perishables
Packing pantry items involves food safety, weight management, and leak prevention — all critical for avoiding disaster on moving day.
What to Move vs. What to Discard:
- Move: Unopened specialty items, expensive spices, unopened oils and vinegars, dry goods in sealed containers
- Discard or donate: Opened flour, sugar, rice in bulk packaging; expired items; bulky low-value staples that cost less to replace than move
Packing Dry Goods:
Transfer all opened dry goods into ziplock bags before packing. Place bagged items in small boxes to keep weight manageable. Never pack food items with cleaning supplies or non-food kitchen items.
Packing Spices and Condiments:
Check all lids for tightness. Place the entire spice collection in a large ziplock bag before packing in a small box — this contains leaks if bottles break or lids loosen during transit. Pack condiment bottles upright with cushioning between each bottle.
Perishables:
Do not move perishable food items unless you are relocating within the same city and will unpack immediately. For long-distance moves, consume or donate all perishables before moving day. Use a cooler for items that must travel with you during the drive.
Kitchen Packing Timeline and Final Checklist
This kitchen packing guide timeline ensures you complete kitchen packing systematically without last-minute panic.
7 Days Before Moving:
- Declutter and donate unwanted kitchen items
- Order or gather all packing supplies
- Begin packing specialty items, seasonal dishware, and rarely used appliances
3–5 Days Before Moving:
- Pack everyday dishes, cookware, and non-essential pantry items
- Defrost refrigerator and freezer (if moving these appliances)
- Eat through perishables to minimize waste
2 Days Before Moving:
- Pack remaining kitchen items except final-day essentials
- Clean and prepare appliances for transport
- Label all boxes clearly with contents and destination
Moving Day Morning:
- Pack coffee maker, final mugs, last-minute cleaning supplies
- Do final kitchen wipe-down
- Conduct final inventory check against your packing checklist
The settling after moving guide covers what happens after the truck unloads, and the first week after moving to Ottawa resource helps newcomers establish routines in the capital region.
When to Hire Professional Packing Support for Your Kitchen
For households with extensive china collections, large kitchens, or limited packing time, professional packing services eliminate stress and reduce breakage risk. Metropolitan Movers Ottawa provides full-service kitchen packing using professional-grade materials, proven wrapping techniques, and efficient timelines that complete in hours what would take days for DIY packers.
Professional packing also includes liability coverage — if items break due to packer error, they are covered. DIY packing places full responsibility on the homeowner.
For families managing entire household relocations, the residential moving in Ottawa service covers full-home logistics, and the house moving service handles everything from packing through final placement at your new address.
For those relocating to Ottawa from other Canadian cities, Metropolitan Movers Ottawa manages long-distance kitchen relocations as part of comprehensive cross-province moves. Relevant routes include moving from Toronto to Ottawa, Toronto to Montreal, and Toronto to Halifax.
For budgeting context around professional moving support, the moving cost guide Canada breaks down pricing factors across local and long-distance relocations.
FAQs: Kitchen Packing Guide
How far in advance should I start packing my kitchen?
Start your kitchen packing guide timeline 7–10 days before moving day. Begin with specialty items, seasonal dishware, and rarely used appliances, then work toward everyday items. Pack your final essentials (coffee maker, a few mugs, basic utensils) on moving day morning. This phased approach prevents disruption to daily meal preparation while ensuring everything is packed systematically.
What is the best way to pack dishes without them breaking?
Packing dishes safely requires individual wrapping with 3–4 sheets of packing paper per plate, vertical stacking (on their edges, never flat) inside dish pack boxes, and heavy cushioning with crumpled paper on the bottom and sides of each box. Keep box weight under 50 pounds, label all sides as fragile, and fill every empty space so nothing shifts during transit.
Do I need special boxes for packing glassware?
Yes. Cell kits — cardboard dividers that create individual compartments for each glass — prevent glass-to-glass contact that causes breakage. Wrap each glass individually in packing paper (stuff the inside first), place upright in each cell, and fill the top with crumpled paper before sealing. For crystal or heirloom glassware, add a bubble wrap layer over packing paper. The how to pack glassware guide provides detailed techniques.
How do I pack kitchen appliances like coffee makers and blenders?
Pack small appliances in their original boxes whenever possible. If original packaging is unavailable, wrap each appliance in bubble wrap, secure cords with stretch wrap or twist ties, remove glass components (carafes, bowls) and pack separately, and cushion heavily on all sides inside appropriately sized boxes. The how to pack for moving resources covers appliance preparation across all rooms.
Should I move pantry items or throw them out?
Move unopened specialty items, expensive spices, and sealed dry goods. Discard or donate opened flour, sugar, bulk rice, expired items, and bulky low-value staples that cost less to replace than move. Transfer all opened dry goods into ziplock bags before packing, and never pack food with cleaning supplies. For long-distance moves, consume or donate all perishables before moving day.
How do I prepare my refrigerator for moving?
Defrost your refrigerator 24–48 hours before moving day, remove all food and shelving, clean and dry the interior completely to prevent mold during transit, disconnect water lines (if applicable) and cap connections, and secure doors with stretch wrap or moving straps. Never use tape directly on appliance surfaces. The complete moving guide covers appliance preparation as part of full-home relocation planning.
What is the best labeling system for kitchen boxes?
Label all kitchen boxes with room destination (“KITCHEN”), detailed contents (“Everyday Plates — China Cabinet”), fragile indicators on all four sides and top, and priority markers (“UNPACK FIRST”) for boxes containing first-day essentials. Color-coded labels (assign each room a color) allow movers to place boxes in correct rooms visually without reading every label.
Does Metropolitan Movers Ottawa provide packing services for just the kitchen?
Yes. Metropolitan Movers Ottawa offers both full-service packing for entire homes and room-specific packing services for households that want professional handling of the kitchen while managing other rooms themselves. Professional kitchen packing includes all materials, wrapping, boxing, labeling, and liability coverage. The packing and unpacking service page provides full service details, and the complete packing guide for moving covers whole-home packing strategy.
Your Kitchen Packing Guide: From Overwhelmed to Organized
This kitchen packing guide transforms the most challenging room in your home from an overwhelming packing disaster into a systematic, manageable process. By following the material checklist, wrapping techniques, timeline structure, and labeling strategy outlined here, you protect your fragile items, manage box weight safely, and create an unpacking experience that flows logically rather than chaotically.
For the complete moving preparation framework beyond just kitchen packing, the complete moving guide covers every phase of your relocation from initial planning through settling in. The packing checklist for moving ensures every room is addressed systematically, and the how to pack a moving container resource covers loading strategy for both moving trucks and storage units.
When moving day arrives, Metropolitan Movers Ottawa handles every operational detail — whether you packed yourself using this kitchen packing guide or hired professional packing support. The local moving service covers Ottawa-area relocations, while the long-distance movers team manages cross-province and cross-country moves. Explore the full services page or contact the team to begin planning your move.