Shoes are one of the most overlooked categories in any household move — and one of the most consistently damaged as a result. Leather soles crack from compression against hard surfaces. Heels snap under the weight of other items stacked on top of them. Scuffs appear on surfaces that were pristine when packed. White soles yellow from dye transfer when pairs are bundled together without protection. A shoe collection that represents hundreds or thousands of dollars in investment arrives at the new home in worse condition than it left — not from any dramatic incident, but from entirely preventable packing errors that most movers never think about until they open the box. Learning how to pack shoes for moving correctly protects that investment, maintains the condition of every pair, and eliminates the sorting chaos that comes from shoes packed without organizational logic. For the complete household packing framework that situates shoe packing within a full relocation plan, the complete packing guide for moving is the most comprehensive resource available for Ottawa residents preparing for any size move.
Why Shoe Packing Deserves Deliberate Attention
Shoes occupy a unique position in household packing because they combine several challenging properties simultaneously — they are heavy relative to their size, irregularly shaped, made of a wide range of materials with different protection requirements, and capable of transferring damage to each other when packed without appropriate separation.
The primary categories of shoe damage that occur during moves are:
- Structural deformation — shoes packed under weight or without internal support lose their shape permanently when the materials that hold their form are compressed for extended periods
- Surface damage — leather scuffs, suede nap compression, patent leather cracking, and fabric staining all occur when shoes contact each other or other surfaces without adequate protection
- Dye transfer — dark-soled shoes in contact with lighter-colored shoes transfer dye through direct contact, particularly during the warmth and pressure of a truck environment
- Heel and sole separation — thin heels snap and adhesive soles separate when subjected to the specific pressure patterns that poorly packed boxes create
- Mildew from moisture — shoes packed with any residual moisture from recent wear develop mildew during transit, particularly in sealed boxes in a warm truck environment
Every decision made when learning how to pack shoes for moving should address these five failure categories. The correct approach is not complicated — but it requires materials, organization, and a category-by-category treatment that generic packing advice never provides. Before beginning, reviewing the packing checklist for moving ensures all required materials are assembled before the first pair is touched.
Essential Materials for Packing Shoes Correctly
Having the right materials assembled before packing begins eliminates the improvisation that leads to damage. The materials required for shoe packing are modest in cost and available at any moving supply store:
Clean, unprinted packing paper — the foundation of shoe protection for wrapping individual pairs and stuffing interiors. Newspaper is not appropriate — ink transfers to shoe linings, soles, and uppers, particularly in the warmth of a moving truck.
Acid-free tissue paper — necessary for leather shoes, suede, and any footwear where chemical interaction between standard paper and material could cause discoloration or damage over extended contact. For high-value and designer footwear, acid-free tissue is not optional.
Soft cotton shoe bags — fabric bags that provide a breathable protective barrier around individual pairs, preventing surface-to-surface contact without the compression that rigid packaging creates. Many quality shoes come with dust bags — these should be used if available.
Original shoe boxes — the most dimensionally perfect container available for any pair of shoes. Original boxes are specifically engineered to the exact dimensions of each shoe, protecting shape and surface without compression.
Small to medium moving boxes — for shoes being packed without original boxes, small moving boxes are the correct size. Large boxes accommodate too many shoes and create the weight and compression problems that damage footwear.
Large plastic storage bins with lids — an excellent alternative to cardboard boxes for shoes, providing structural rigidity that prevents compression from stacked items and moisture resistance that cardboard cannot offer.
Bubble wrap — for high heels, fragile embellishments, and rigid leather shoes that require cushioning beyond what packing paper provides.
Packing tape — for securing wrapped pairs and sealing boxes.
| Material | Primary Use | Best For | Key Advantage |
|---|---|---|---|
| Unprinted packing paper | Stuffing interiors, wrapping pairs | Everyday shoes, casual footwear | Ink-free, flexible, affordable |
| Acid-free tissue paper | Wrapping and interior stuffing | Leather, suede, designer footwear | Prevents chemical damage and discoloration |
| Soft cotton shoe bags | Individual pair containment | All quality footwear | Breathable, prevents surface contact |
| Original shoe boxes | Individual pair storage | All shoes with original packaging | Perfect fit, engineered for each shoe |
| Bubble wrap | Heel protection, embellishment wrapping | High heels, embellished, rigid leather | Superior cushioning for fragile elements |
| Large plastic storage bins | Multi-pair container | All shoe categories, long-distance moves | Rigid walls prevent compression, moisture-resistant |
Individual Shoe Boxes: The Best Starting Point for Any Shoe Collection
If you have retained the original boxes for any portion of your shoe collection, those boxes are the single best packing container available for the corresponding pairs. Original shoe boxes are engineered to the exact dimensions of each specific shoe — they hold the shoe in its correct form without compression, protect surfaces from contact, and stack uniformly in moving boxes or bins.
Why original boxes are superior to any alternative: Original manufacturer boxes are designed with the specific shoe’s dimensions, weight, and materials in mind. A dress shoe box maintains the shoe’s shape precisely. A sneaker box provides the correct internal depth for the outsole without pressure on the toe box. A boot box accommodates shaft height without folding the material. No generic moving box replicates this precision.
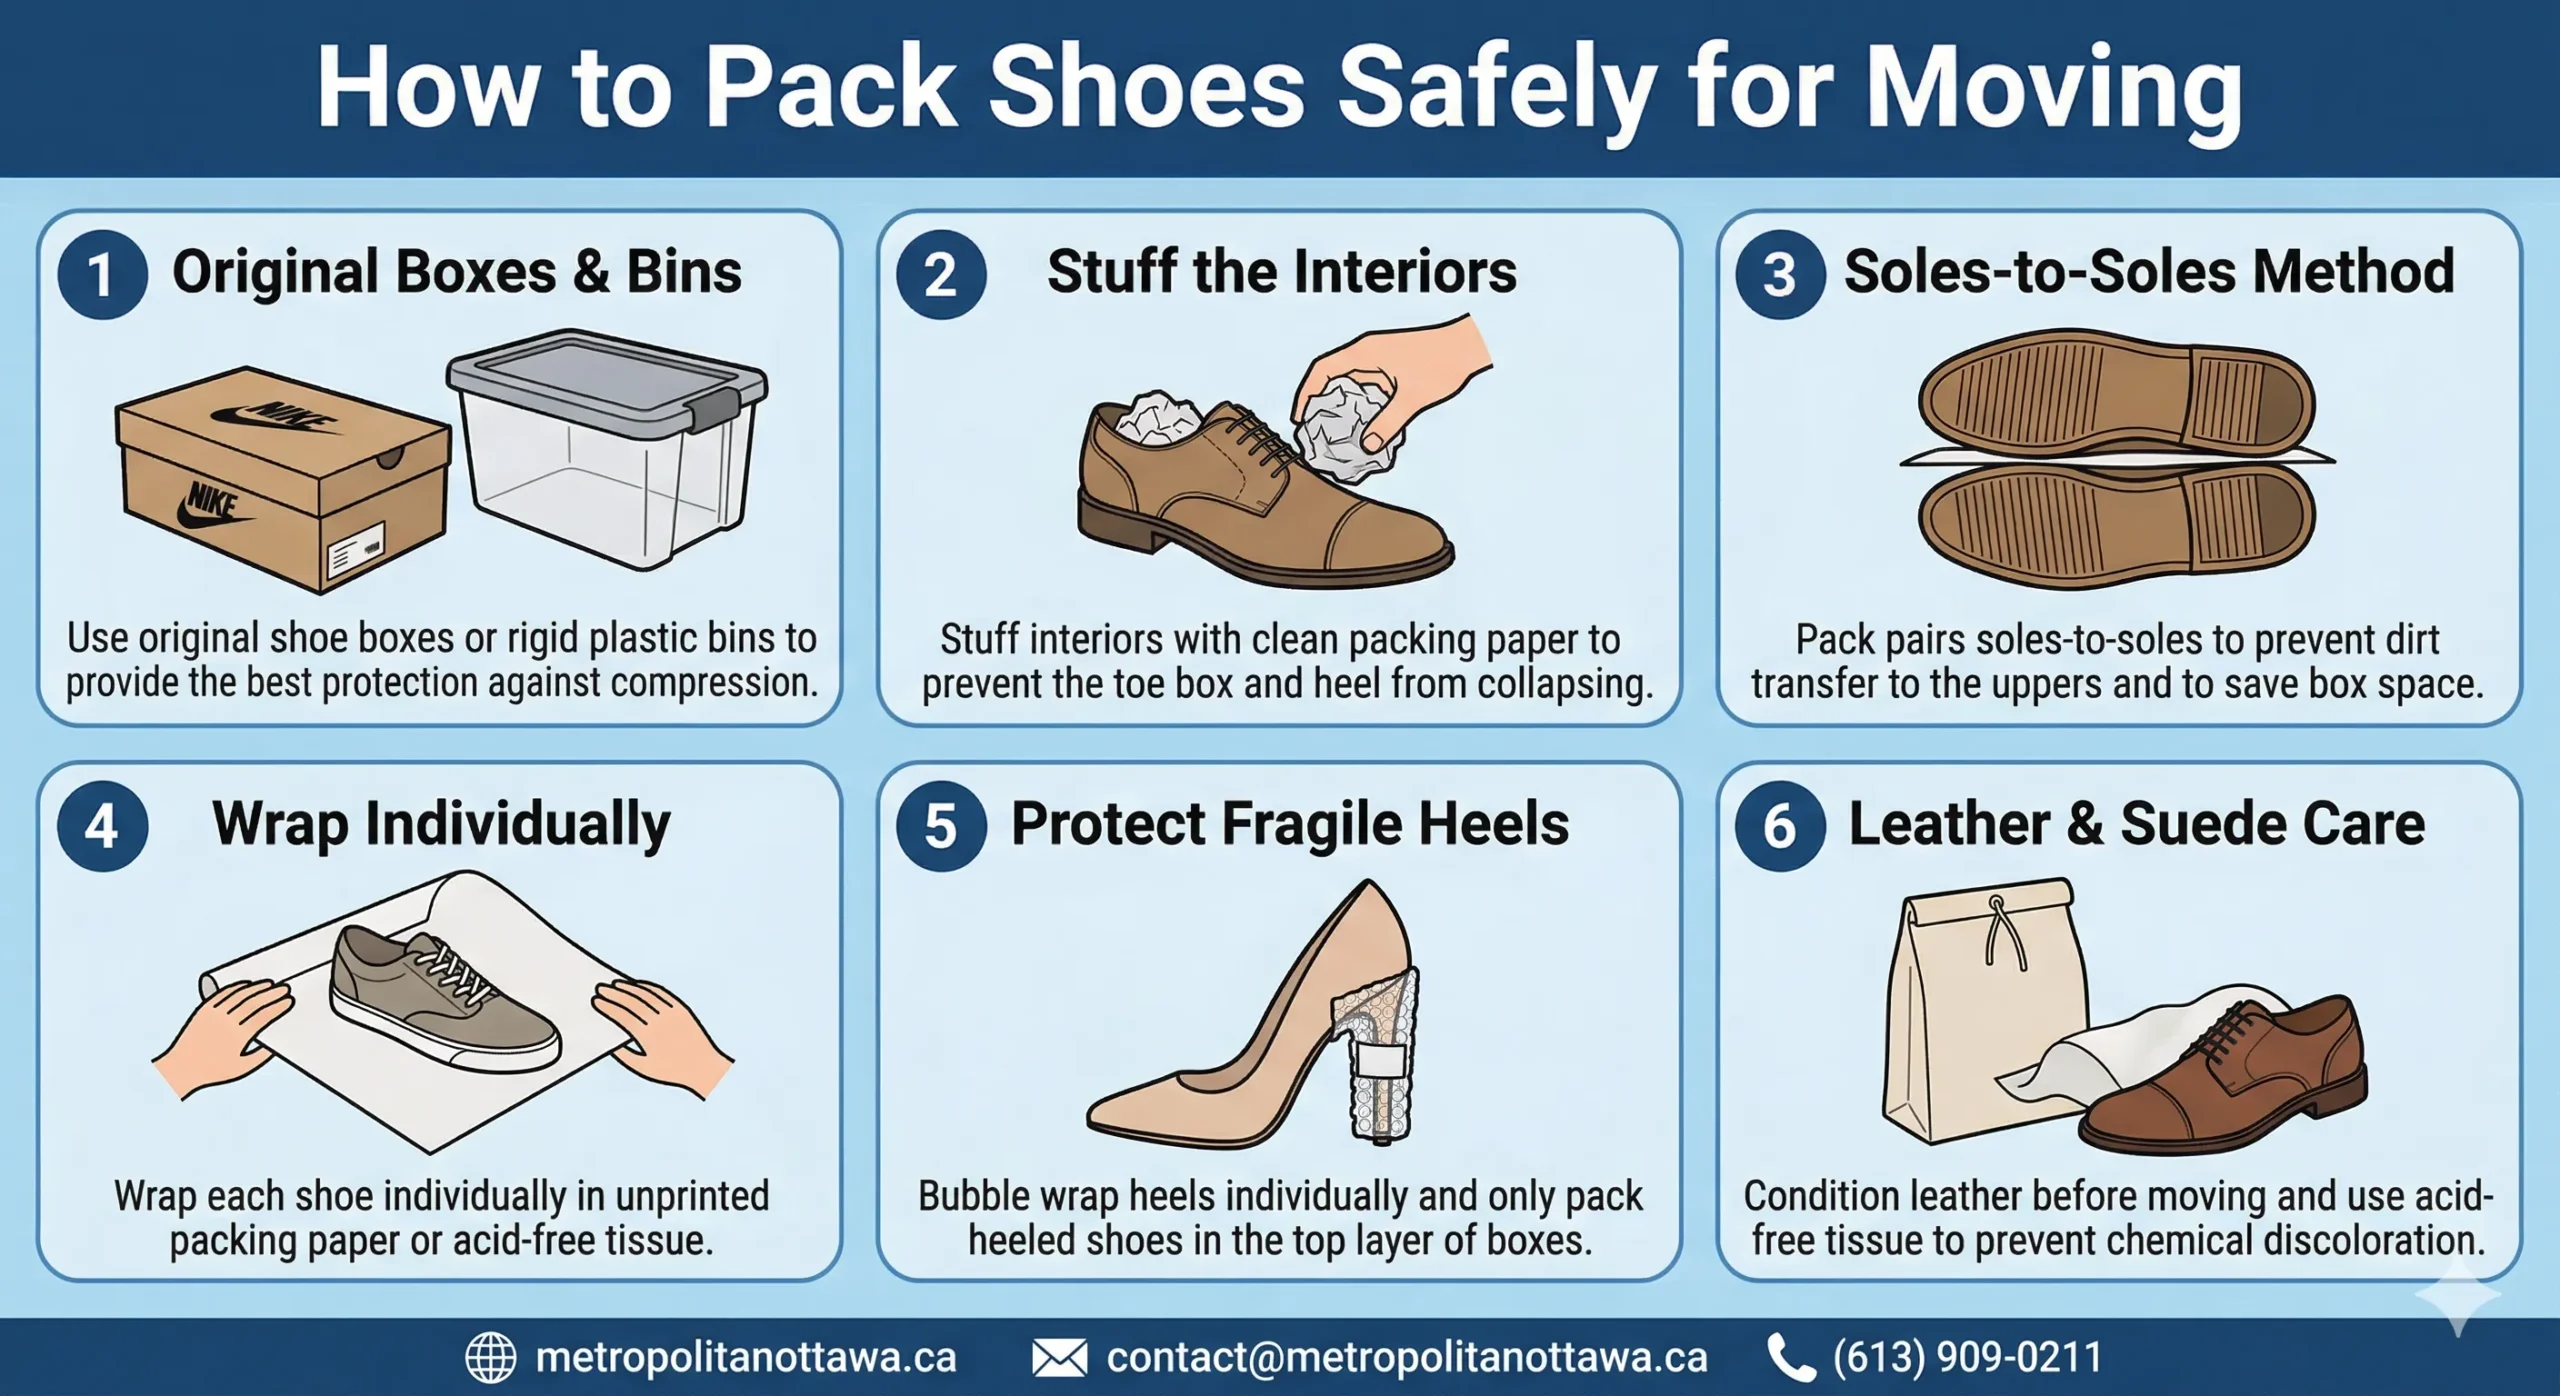
Using original boxes correctly: Before placing shoes in their original boxes for a move, stuff each shoe with clean packing paper to maintain interior shape during transit. Even with original boxes, shoes that are not internally supported can lose their form under the cumulative pressure of other boxes stacked above. Tape original boxes closed with a single strip of packing tape across the lid seam — enough to prevent the box from opening during handling without creating adhesive residue on the original packaging.
Label each original box on the end panel visible when boxes are stacked — the same way shoe store stockrooms are organized. This end-panel labeling system allows you to identify any specific pair without unstacking and opening boxes individually.
When original boxes are not available: For shoes without original boxes, small moving boxes lined with packing paper are the next best option. Wrap each pair individually before placing in the box, and stuff interiors with packing paper before wrapping the exterior.
Stuffing Shoes with Clean Paper: Why Interior Support Matters
Stuffing shoes with clean packing paper before wrapping and packing them is one of the most impactful single steps in the entire shoe packing process — and one that most movers skip because its importance is not intuitively obvious until the first time they unpack a collapsed toe box or a heeled shoe whose internal counter has buckled.
The structural function of interior stuffing: Shoes maintain their shape through a combination of rigid internal components — the last shape, toe box, heel counter, and midfoot shank — and the material tension created when those components are under normal wearing conditions. When shoes are packed and stacked, the compressive force from above overcomes the shoe’s internal structure, collapsing the toe box, crushing the heel counter, and deforming the overall shape in ways that may be permanent in leather and synthetic leather shoes.
Stuffing the interior with packing paper restores the internal pressure that the foot normally provides, giving the rigid components something to brace against and maintaining dimensional integrity throughout the transit period.
The correct stuffing technique: Crumple packing paper loosely rather than packing it tightly — the goal is to fill the interior volume with a compressible buffer, not to create additional internal pressure. Start at the toe box, working paper into the front of the shoe until the toe area holds its natural round shape. Fill the midfoot and heel area, ensuring the heel counter maintains its curved form. The stuffed shoe should feel firm when gently squeezed but not tightly packed.
Material considerations: Always use clean, unprinted packing paper for stuffing. Newspaper ink transfers onto shoe linings with even brief contact, and the lining of a quality leather or fabric shoe is difficult to clean. For white or light-colored shoe linings, acid-free tissue paper eliminates the risk of any transfer entirely. For shoes being stored for an extended period after the move, cedar shoe trees are preferable to paper for maintaining shape while absorbing moisture.
The Soles-to-Soles Packing Method: Eliminating the Most Common Source of Shoe Damage
The soles-to-soles packing method is the most important technique for preventing the surface damage and dye transfer that occurs when shoes are packed incorrectly in pairs. Understanding this method and applying it consistently across every pair in your collection eliminates the most common source of shoe damage during moves.
The problem with conventional pair packing: The instinctive way to pack a pair of shoes is to place them together as they naturally sit — both shoes right-side up with toe boxes facing the same direction, as if on a shelf. This position creates several problems simultaneously:
- The dirty outsoles face upward toward the uppers of the pair above, transferring soil and rubber residue to the vamp and toe cap
- The heel counter of one shoe can press against the vamp of the other, creating scuffs and impression marks in leather and patent surfaces
- The overall height of a right-side-up pair is maximized, reducing how many pairs fit in a box and increasing the number of stacking layers
The soles-to-soles solution: Place both shoes of a pair with their outsoles facing each other — one shoe right-side up and one shoe flipped upside-down, so the soles press together rather than either sole facing upward toward a garment or upward surface. This position:
- Keeps both outsoles contained between the shoes rather than in contact with any uppers or linings
- Reduces the overall height of the pair by approximately 30–40%, fitting more pairs per box layer
- Prevents heel-to-vamp contact that causes scuffing
- Creates a more stable, uniform package that is easier to wrap and stack
Place a sheet of packing paper between the two soles before pressing them together — this prevents the outsole of one shoe from marking the outsole of the other, and keeps any residual dirt contained.
How to Pack Different Shoe Types: Category-by-Category Guidance
Different shoe constructions and materials present different packing challenges. A single universal approach applied to an entire shoe collection will protect some pairs adequately and damage others. Category-specific guidance ensures every pair receives the treatment its construction requires.
Athletic Shoes and Sneakers
Athletic shoes are the most forgiving category — their flexible materials, thick outsoles, and generally non-precious construction tolerate a range of packing approaches without damage. Apply the soles-to-soles method, stuff interiors with packing paper, and wrap the pair in two to three sheets of packing paper before boxing. Sneakers with white or light-colored soles benefit particularly from the paper barrier between soles that prevents rubber yellowing and sole-to-sole transfer.
For valuable or collectible sneakers — limited edition releases, unworn pairs held for resale, or designer collaborations — treat as high-value footwear. Use acid-free tissue paper, original boxes, and consider individual plastic bags around the boxed shoes to prevent any contact with adjacent items during transit.
Leather Dress Shoes and Oxfords
Leather dress shoes require the most careful protection of any everyday footwear category because leather is vulnerable to scuffing, pressure marks, and dye transfer in ways that synthetic materials are not. Before packing, clean and condition all leather shoes — leather conditioner applied before a move maintains the material’s flexibility during the temperature variations of transit.
Stuff interiors with acid-free tissue paper. Wrap each shoe individually in acid-free tissue rather than standard packing paper. Use the soles-to-soles method and wrap the pair in a soft cotton shoe bag before placing in the original box or wrapping in packing paper for boxing. Leather shoes should never be in direct contact with other leather shoes — the pressure and heat of a moving truck environment accelerates dye transfer between dark and light leather surfaces.
High Heels and Stilettos
High heels are among the most fragile footwear structures in any shoe collection. The heel itself — particularly stilettos and thin kitten heels — is vulnerable to snapping under lateral pressure or impact during transit. The heel tip, which is often a small plastic or rubber insert, can be lost if the heel contacts hard surfaces.
Wrap each heel individually, starting with the heel itself. Tear a strip of bubble wrap approximately 6 inches wide and wrap it around the heel from tip to heel cup, securing with a small piece of tape. Then wrap the shoe body in packing paper or acid-free tissue. Use the soles-to-soles method for pairing before boxing. Pack heels in layers where they receive no weight from above — heeled shoes should always be in the top layer of any box, never the bottom.
Boots and Knee-High Boots
Boots present a unique packing challenge because of their height — the shaft of a knee-high or over-the-knee boot requires support during packing to prevent the leather or fabric from folding, creasing, and eventually developing permanent crease lines that reduce both appearance and material longevity.
Stuff the shaft of each boot with rolled packing paper or foam rollers to maintain its tubular form throughout transit. A toilet paper tube inside the shaft of shorter boots, or a full paper roll inside taller boots, provides an effective and free structural support. For leather boots, condition the material before packing and wrap in a cotton boot bag or large sheet of acid-free tissue. Pack boots standing upright in a tall box or bin where shaft height is accommodated without folding.
Suede and Fabric Shoes
Suede and fabric uppers require particular attention because their textured or woven surfaces are vulnerable to compression that flattens the nap or distorts the weave pattern in ways that are difficult to reverse. Wrap suede shoes in acid-free tissue paper only — never standard packing paper, which can transfer surface texture impressions onto soft suede. Avoid placing heavy items directly on boxed suede shoes.
For delicate fabric shoes including wedding heels, embroidered styles, and beaded footwear, wrap in multiple layers of acid-free tissue and place individually in small boxes or rigid containers before placing in the larger moving container.
| Shoe Type | Wrapping Material | Interior Stuffing | Special Consideration | Box Position |
|---|---|---|---|---|
| Athletic shoes and sneakers | Packing paper | Crumpled packing paper | Paper barrier between soles prevents yellowing | Any layer |
| Leather dress shoes | Acid-free tissue + cotton shoe bag | Acid-free tissue paper | Condition leather before packing | Middle layers |
| High heels and stilettos | Bubble wrap on heel + packing paper on body | Crumpled tissue | Bubble wrap each heel individually | Top layer only |
| Boots | Cotton bag or acid-free tissue | Rolled paper in shaft | Support shaft to prevent permanent creasing | Upright in tall container |
| Suede shoes | Acid-free tissue only | Acid-free tissue | Never use standard packing paper on suede | Top layers — no weight above |
| Embellished and beaded shoes | Multiple layers acid-free tissue | Tissue paper only | Individual small box before main container | Top layer — no contact with other items |
Protecting Leather Footwear: Pre-Move Preparation That Makes a Measurable Difference
Leather footwear requires preparation before packing begins — not just during the wrapping and boxing process. The condition of leather going into a move determines how it emerges at the other end, and a brief pre-move care routine makes a significant difference in transit outcomes.
Clean all leather surfaces before packing: Leather should be clean before wrapping. Residual soil, salt stains from winter footwear, and surface oils on the leather surface interact with packing materials during transit in ways that clean leather does not. Use an appropriate leather cleaner for the specific leather type — smooth leather, full-grain leather, patent leather, and nubuck each require different cleaning formulations.
Condition leather before wrapping: Leather conditioner applied 24–48 hours before packing penetrates the leather and maintains its flexibility during the temperature variations of transit. A truck environment in summer can reach temperatures that dry out untreated leather, while winter moves can expose leather to temperature swings that cause cracking in unconditioned materials.
Polish dress shoes before packing: A fresh coat of shoe cream or wax polish on leather dress shoes before packing provides both color maintenance and a protective surface layer that reduces scuff transfer during the packing and unpacking process. Allow polish to dry completely before wrapping.
Protect patent leather separately: Patent leather shoes require specific protection because the lacquered surface is uniquely vulnerable to sticking and color transfer when in contact with other materials. Wrap patent leather shoes in acid-free tissue paper and then in a smooth cotton shoe bag — never in bubble wrap directly, as the bubble texture can leave impression marks on the patent surface under compression.
The how to pack fragile items guide provides additional context on protecting high-value belongings with surface-sensitive materials — principles that apply directly to leather and patent footwear.
Large Plastic Storage Bins: The Superior Container for Shoe Collections
Cardboard boxes are the default container for most household packing — but for shoes specifically, large plastic storage bins with lids are a meaningfully superior option that most movers never consider.
The structural advantage: Plastic bins have rigid walls that maintain their shape under stacking weight without compressing. A cardboard box stacked under other heavy boxes will eventually compress its walls enough to reduce interior clearance and create pressure on shoe contents. A rigid plastic bin maintains its interior dimensions regardless of what is stacked on top, protecting heel heights and toe box shapes throughout the move.
The moisture advantage: Cardboard absorbs humidity. In a moving truck that experiences temperature changes between loading and delivery — particularly in long-distance moves to cities like Halifax or Edmonton where weather conditions vary across the route — cardboard boxes can absorb sufficient moisture to transfer dampness to shoe linings and leather surfaces. Plastic bins provide complete moisture isolation for their contents.
The reuse advantage: Plastic storage bins used for moving become permanent shoe storage containers after the move — particularly valuable for seasonal shoes that rotate in and out of closet use. The investment in quality storage bins during a move pays ongoing dividends in organized post-move storage.
Using bins correctly: Line the bottom of the bin with a layer of packing paper before placing any shoes. Pack heavy shoes — boots, thick-soled sneakers — in the bottom layer and delicate shoes — heels, embellished styles — in the top layer. Fill all void space with crumpled packing paper to prevent pairs from shifting and contacting each other during transit. Secure the lid with plastic stretch wrap rather than tape to maintain the lid’s reuse value.
Over-the-Door Shoe Organizers: Packing and Unpacking Hack for Casual Footwear
Over-the-door shoe organizers — the fabric pocket organizers that hang from a door’s top edge — are typically thought of as storage solutions rather than packing tools. Used correctly during a move, they serve as one of the most efficient containers for casual and everyday flat shoes.
The packing application: Lay the shoe organizer flat on a clean surface. Place one casual flat shoe — ballet flats, sandals, slip-ons, light sneakers — in each pocket. The fabric pockets provide individual containment that prevents shoe-to-shoe contact without requiring individual wrapping for each pair. Roll the organizer loosely from bottom to top and secure with rubber bands or packing tape around the roll. Place the rolled organizer in a large moving box or bin alongside other packed items.
What works in shoe organizer pockets:
- Flat sandals and slides
- Ballet flats and loafers
- Light canvas sneakers
- Flip flops and pool slides
- Children’s shoes
What does not work: Anything with significant heel height, structured toe boxes, or rigid soles is too large for most organizer pockets and risks deformation if forced into a pocket that does not accommodate the shoe’s natural dimensions.
The unpacking application: At the destination, the shoe organizer is already your storage solution — hang it immediately and the shoes it contains are already organized and accessible without any unpacking step beyond hanging the organizer.
Sorting Shoes by Frequency of Use: The Organization System That Pays Off at Unpacking
The sequence in which you sort, pack, and label shoes before a move determines how efficiently you can access footwear during and after the relocation. A deliberate sorting approach transforms what could be a chaotic post-move search for specific pairs into a straightforward, organized unpacking experience.
Sort into three categories before packing:
Category One — Essential and Frequent Use: Shoes worn multiple times per week — everyday work shoes, primary casual shoes, athletic shoes used regularly. These should be packed last and are the first priority for unpacking. Pack in clearly labeled containers that are loaded last on the moving truck — last in means first off.
Category Two — Regular but Not Daily Use: Shoes worn weekly or for specific occasions — going-out shoes, seasonal everyday wear, weekend-specific footwear. Pack these after Category One with labeling that identifies them as second-priority for unpacking.
Category Three — Occasional, Seasonal, or Special Occasion: Shoes worn rarely — formal occasion shoes, off-season footwear, sport-specific shoes used infrequently, sentimental pieces kept but not worn. These should be packed first, clearly labeled as low-priority, and can remain in storage bins for extended periods without disrupting daily routines.
This three-category sorting approach pairs naturally with the organizational principles in the how to unpack after moving guide, which provides the complete framework for sequencing unpacking priorities across all household categories after arrival.
Labeling containers with specific information: Each shoe container should be labeled with:
- Destination room or closet — MASTER CLOSET, FRONT HALL, KIDS ROOM
- Category — EVERYDAY SHOES, FORMAL SHOES, SPORTS SHOES, SEASONAL
- Frequency priority — UNPACK FIRST, UNPACK WEEK 1, UNPACK MONTH 1
- Owner in multi-person households — ADULTS, CHILDREN, SPECIFIC NAME
Preventing Shoe Scuffs and Stains During Transit: The Details That Matter
Beyond wrapping and boxing technique, several additional measures prevent the surface damage that occurs despite correct packing when shoes are not fully prepared for the transit environment.
Sole cleaning before packing: Dirty outsoles transfer soil and rubber compounds to adjacent shoes regardless of wrapping — the pressure of transit compresses the barriers between soles enough for surface transfer to occur. Wipe all outsoles with a damp cloth before packing and allow to dry completely before wrapping.
Avoid packing damp shoes: Shoes worn recently and still retaining any internal moisture should be allowed to dry fully for at least 24–48 hours before packing. Sealed damp shoes develop mildew during transit and can damage adjacent pairs.
Separate new shoes from worn shoes: The outsoles of new shoes contain release chemicals and rubber compounds that have not been worn to a stable condition. New and worn shoes packed together can transfer these compounds across the packing paper barrier during extended transit.
Use individual bags for dark-soled shoes: Dark rubber and leather soles are the most common source of dye transfer to adjacent shoe surfaces. Placing each dark-soled pair in a zip-lock bag or cotton shoe bag before wrapping provides an additional barrier that standard packing paper alone cannot fully guarantee during extended transit in warm conditions.
Packing Shoes for Long-Distance Moves: What Changes Over Distance
Packing shoes for a local move within Ottawa, Orleans, or Nepean involves relatively short transit exposure. A long-distance move to Vancouver, Calgary, or Quebec City introduces multi-day transit time with temperature variation, road vibration, and multiple handling points that local moves do not require.
For long-distance shoe moves:
- Use plastic bins rather than cardboard boxes wherever possible — the moisture and compression resistance that plastic provides becomes meaningfully more valuable over extended transit
- Double-wrap leather and suede — a layer of acid-free tissue followed by a layer of packing paper, rather than either alone
- Add cedar sachets to shoe containers — cedar absorbs moisture during extended transit and protects against mildew without chemical residue
- Secure original shoe box lids with tape — vibration over multi-day transit can work box lids open, exposing contents
- Do not pack shoes in the same container as clothing — the combined environment of fabric dye, rubber sole compounds, and varying material off-gassing creates transfer risk that separate containers eliminate
The long-distance moving guide covers the full preparation framework for moves where distance introduces complexity beyond standard local move planning, including considerations for footwear and high-value personal items.
Common Shoe Packing Mistakes and How to Avoid Every One
| Common Mistake | Why It Causes Damage | The Correct Approach |
|---|---|---|
| Packing shoes without interior stuffing | Toe boxes collapse and heel counters buckle under transit pressure | Stuff every shoe with crumpled packing paper before wrapping |
| Placing soles facing upward toward uppers | Soil and rubber compounds transfer to shoe surfaces | Use soles-to-soles method — outsoles always face each other |
| Using newspaper for wrapping or stuffing | Ink transfers permanently to linings and light-colored surfaces | Use unprinted packing paper or acid-free tissue exclusively |
| Packing heels in bottom box layers | Weight from above snaps thin heels and compresses heel cups | Pack heeled shoes in the top layer only — nothing above them |
| Not conditioning leather before packing | Temperature variation during transit dries and cracks unconditioned leather | Clean and condition all leather 24–48 hours before packing |
| Packing boots without shaft support | Shaft folds and develops permanent crease lines during transit | Stuff boot shafts with rolled paper to maintain tubular form |
| Mixing shoe categories in unlabeled boxes | Creates sorting chaos during unpacking | Sort by frequency of use, label with room, category, and priority |
| Packing damp shoes in sealed containers | Mildew develops during transit and damages adjacent pairs | Allow all shoes to dry completely for 24–48 hours before packing |
When Professional Packing Is the Right Choice for Your Shoe Collection
Learning how to pack shoes for moving is entirely within the capability of any household that follows correct technique. However, certain circumstances make professional packing and unpacking services from Metropolitan Movers Ottawa the more practical and protective choice:
- Large or valuable shoe collections where the time required for proper individual wrapping of every pair exceeds what the moving timeline allows
- Designer and luxury footwear where the replacement cost of a single damaged pair exceeds what the cost of professional packing services would be for the entire collection
- Combined moves where shoe packing competes with every other household category for packing time and attention
- Senior relocations where the physical demands of bending, wrapping, and boxing dozens of pairs presents genuine difficulty
- Long-distance moves where professional packing provides the liability coverage that owner-packed items typically do not receive
Metropolitan Movers Ottawa brings over 15 years of experience to shoe collection packing and household moves of every scale. The complete packing guide for moving outlines the full scope of professional packing services available for Ottawa residents at every move size.
Frequently Asked Questions
What is the best way to pack shoes for moving?
The best way to pack shoes for moving combines interior stuffing with crumpled packing paper, the soles-to-soles pairing method, individual wrapping in appropriate materials for each shoe type, and organization by frequency of use with detailed container labeling. Use original shoe boxes when available, plastic storage bins for moisture and compression resistance, and acid-free tissue for leather and suede footwear.
How do I prevent shoes from getting scuffed during a move?
Prevent scuffing by wrapping each pair individually before boxing, using the soles-to-soles method so outsoles face each other rather than toward uppers, placing dark-soled shoes in individual bags before wrapping, and ensuring no shoes are in direct contact with any other shoe surface throughout the packing and transit process.
Should I keep shoes in their original boxes for moving?
Yes — original shoe boxes are the best individual containers available for their corresponding pairs. They are engineered to the exact dimensions of each shoe, protect shape and surface without compression, and stack uniformly in larger moving containers. Tape lids closed and label the end panel for easy identification.
How do I pack high heels safely for a move?
Wrap each heel individually in bubble wrap starting from the heel tip to the heel cup, then wrap the shoe body in packing paper or acid-free tissue. Pack heeled shoes only in the top layer of any box or bin — never in the bottom or middle where weight from above could snap the heel. Use the soles-to-soles method for pairing before final boxing.
Does Metropolitan Movers Ottawa provide professional shoe packing services?
Yes. Metropolitan Movers Ottawa provides comprehensive packing and unpacking services for shoe collections and entire households. The team brings appropriate materials for every shoe category — acid-free tissue, shoe bags, bubble wrap, and proper containers — and applies correct technique across every pair. With over 15 years of experience, the team handles everything from casual sneaker collections to luxury designer footwear with the care each category requires.
Every Pair You Pack Today Should Arrive Ready to Wear Tomorrow
Learning how to pack shoes for moving correctly is one of the most practical investments any household can make before moving day — because shoes that arrive damaged, deformed, or disorganized represent real losses that could have been entirely prevented. Interior stuffing that maintains structure. The soles-to-soles method that eliminates the most common surface damage. Acid-free tissue for leather and suede. Bubble wrap for heels. Plastic bins for moisture resistance. Careful sorting and labeling that makes unpacking efficient rather than chaotic. Every technique in this guide exists because it prevents specific, predictable failures that damage shoes during moves every day. Whether you are packing your own collection using these methods or choosing professional packing services to ensure every pair is handled correctly, the outcome you deserve is opening your containers at the new home and finding every shoe exactly as it left your old closet. Metropolitan Movers Ottawa brings 15+ years of experience to every relocation — from local moves within Kanata and Gatineau to long-distance moves across Canada. When you are ready, reach out today and move every pair with complete confidence.